Holiday Shipping
To see available ready-to-ship items, please visit the Etsy version of this shop, shipping until Dec. 18:
Most designs are made to order.
Orders placed by Dec. 8 will ship for Christmas arrival. Orders placed after Dec. 9 not guaranteed before Christmas.
Holiday Shipping
To see available ready-to-ship items, please visit the Etsy version of this shop, shipping until Dec. 18:
Most designs are made to order.
Orders placed by Dec. 8 will ship for Christmas arrival. Orders placed after Dec. 9 not guaranteed before Christmas.
Holiday Shipping
To see available ready-to-ship items, please visit the Etsy version of this shop, shipping until Dec. 18:
Most designs are made to order.
Orders placed by Dec. 8 will ship for Christmas arrival. Orders placed after Dec. 9 not guaranteed before Christmas.

Nature Inspired
Silver, Bronze & Gold Jewelry
SILVER CLAY TOOLS
When starting out with silver clay, you can buy a starter tool kit or you can buy individual tools. There's no right or wrong way to go about this.
A brilliant thing about silver clay is that you don't need too many tools to get started. You need a work surface, ways to shape the clay, something to keep the clay from sticking to the tools, and method to safely fire your work.
As you learn and grow and the ideas of what you want to make evolve, you can add specific tools to your collection.
Most of tools I reached for on a daily basis are the basic ones I've had for years. These are the ones I recommend to anyone starting out. I describe their uses below, with links. Many of these links are to CoolTools, a small business that offers a great variety of metal clay-specific products.

The starred items below are also offered in the pre-assembled tool kit. Several of these are affiliate links.
Silver Clay
Art Clay Silver is my preferred brand, for workability and price. It is fresh and usable right from the package. It can be torch or kiln fired.

If you have a kiln you can work with Art Clay Silver 950. Sterling is advisable for rings and cuffs.
950 is an enriched sterling, meaning it has 95% silver, and can be marked as sterling because it it over the 92.5% threshold. It's also ready to work with right from the package.

Work Surface


The Clay Board is a larger version of the Tuff Card. It has pads on the bottom making it easily mobile and supports more projects.
These small Teflon coated work surfaces will not stick to your clay. Tuff cards are easy to move from desk to drying area, and are easy to clean.
Acrylic Rolling Tools


An acrylic rolling pin is similarly helpful, though you can use rollers made of many different kinds of materials.
An acrylic rolling board is a clever tool that allows you to roll fine snakes while being able to see what you're doing.
Rolling Supports
Clay slab rolling is a foundational technique used in many designs. The above tools are how you roll; the rolling slats pictured here go on either side of your clay lump to assist you in rolling an even slab at a controlled height.


The same thing can be achieved with standard playing cards. Cards can also be taped together so they don't slide around, and marked to indicate, for example, "4 cards" - which would be the equivalent of the blue slats in the above set.
Sanding Tools

These sanding pads have so many uses. They can be used dry or wet on dried clay pieces. You may only need the two lowest grits - Ultra and Micro. They can have a long life and can be cut into smaller pieces.
If you dry sand clay with these you need to use PPE. If you wet sand silver clay, you need to use a lighter touch; wet sanding tools can make for a really smooth surface, but can also remove clay very quickly.

These sanding papers can also be cut and folded to fit into small spaces. They can be used wet or dry.
Shaping Tools


If you want to splurge a little, these are a single shapers sold individually, in extra firm and size 0. The two shapes I personally find most useful are taper point and flat chisel. Their small size and firmness make them incredibly useful.
These silicone shapers in 5 styles have so many uses as you work in wet clay. I particularly like them for pressing wet to wet, such as when closing bail loops.

Cutting Tools

This needle tool has a particularly fine point and is excellent for many uses, including cutting around the edge of a template or cutting shape.

A hobby knife makes the cleanest cuts of all. Do be cautious of the surface you are cutting on as it may cut that, too. The knife is especially good if you are rolling out clay on a ceramic tile or similar surface.
Tiny Brushes
A couple of different brushes can be quite useful. These can be economy brushes.

A fine brush has many uses, from applying and spreading paste where you need it to be, cleaning up paste, smoothing small areas and creating a texture.

A small dusting brush, such as the wider ones in this set, can clean up your piece for firing, especially if you are setting stones.

Two Important Fluids
Anti-stick. Silver clay will stick all over your acrylic tools and texture tiles unless they are treated with something, and the material is too expensive to waste in that way.
CoolSlip is very effective for this; cover tool surfaces and wipe off excess.

Rehydrating. When clay has been worked and then returned to the package or cut off a project as scraps and returned to the bag, sometimes it needs more than water to be rehydrated. These drops help bring less than smooth, dried out clay back to usability.
You don't need this right out of the gate, but I highly recommend it.
Silver clay can be dehydrated in many different ways in preparation for being fired. This little clay dryer is desk-sized and what I use. A standard ceramic tile can be placed on top to slow drying, which can minimize warping of your piece as it dries.

Clay Dryer

A Selection of Tools for Hand Finishing
A brass wire brush is perhaps the lowest-cost tool for quickly bringing a shine onto your silver after it is fired. Using a soapy bowl of warm water, gently scrub the brush over the surface of the silver to see it transform from matte to bright.

An agate burnisher is a tool for going one step further and giving areas of your silver a near "mirror polish." This is a shiny as it gets when finishing your piece by hand.

Liver of sulfur is one of the methods for giving a darker finish to the surface of silver.
Mold Making
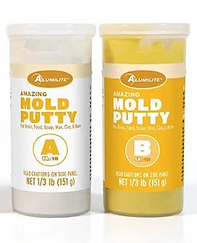
Several two-part silicone mold compounds exist and they do mostly serve the same purpose. This has been my favorite brand for a few years.
More Tools for Finishing and Firing
Mechanical finishing:
- Flex shaft for Dremel
- 3/32" shank mandrels, to hold polishing heads
- Steel shot media for tumbler, for high shine
-Hone and Highlight tumbling media for removing patina from high areas and matte shine


Shaping:
-Explore the "Textures" and "Templates" pages in the Cooltools menu for many options and inspirations. For pre-made molds find "ready molds" on their site.
-Advanced: Ring sizing tools - pre-made ring pellets, ring pellet molds, investment for making pellets
Clay maintenance:
Studio storage:
- 44-Drawer Storage Organizer (Amazon) - how I store my molds, as seen in studio tour
- Wooden Flat Files (Amazon) for stones, tools, etc.
Please read all safety sheets that accompany any tools and chemicals you purchase. I wish you happy, safe working!
Firing:
- The most basic method is with a small butane torch, such as Proxxon (Amazon). That cheaper butane torch from your local hardware store is (very probably) hot enough to fire clay and may work just fine. This is how I began! But they also may at some point overheat when used for 10+ minutes, which eventually means they won't ignite again. The cost of low-mid end torches varies considerably and I would say it's fine to begin with anything inside your budget.
- If using a torch, you will need butane
- To use a torch, you will need a firing surface, such as a firing block (Amazon) or firing block (Cooltools). You can also use a fire brick, fire safe tile, or other fire repellant surface. This block can be placed on another fire repellant surface for height, to further protect the surface you set it on. Be mindful of what is flammable, the reach of your torch flame, etc. Safety first!
- The kiln I use - Paragon SC2 Digital Kiln. It is a powerful, easily controllable workhorse.
